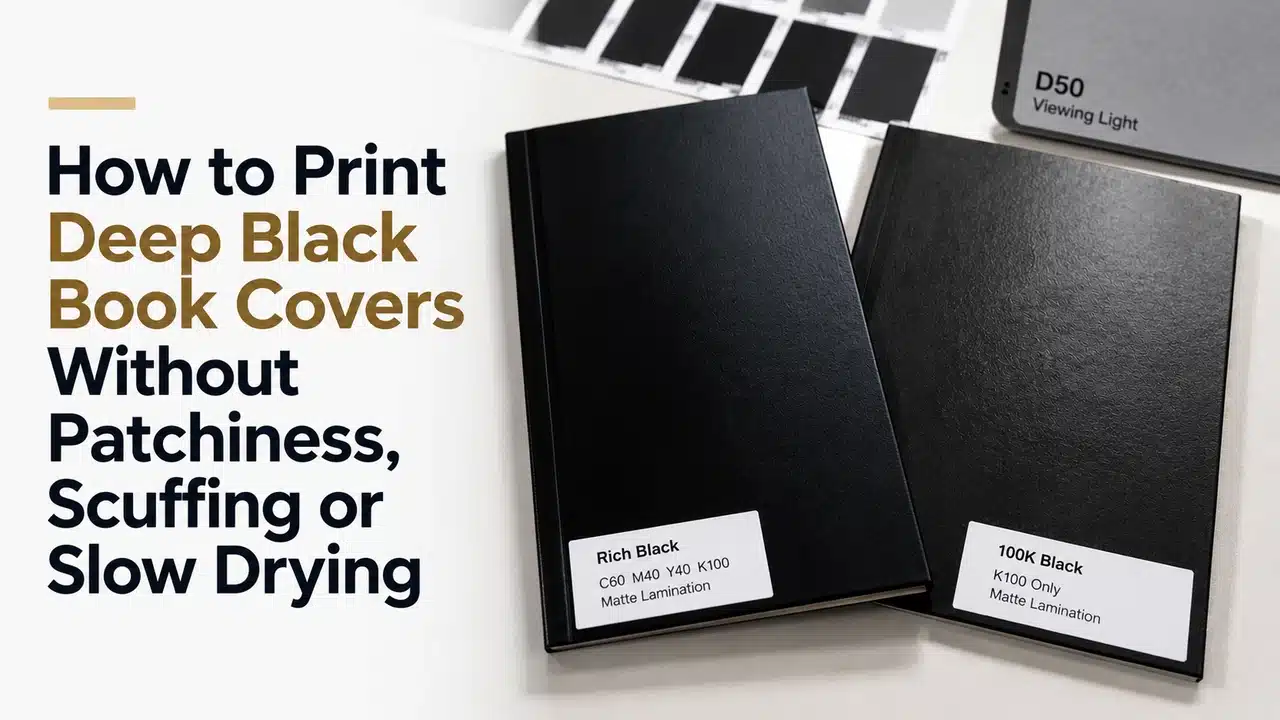
K100` is a text specification. It is not a premium full-cover black specification.
Use 100% process black for small type, fine rules and barcodes. Use a controlled rich black for large printed panels. Mixing those two rules up causes the defects buyers notice immediately: a grey-looking cover, colored fringes around text, visible image boxes, slow drying, setoff and scuffed matte surfaces.
For PrintPack360 offset-printed paper covers, the default production rule is:
Use C40 M30 Y30 K100 for large neutral-black areas, keep total ink coverage at or below 240%, use K100 only for small black text and fine rules, and approve the black after the intended lamination has been applied.
This is a conservative neutral-black starting point, not permission to ignore the output profile. When PrintPack360 supplies a job-specific ICC profile or black recipe, that production instruction replaces the default. Do not import a richer formula from another printer, press or paper.
The specification applies to printed paper cases, dust jackets, paperback covers and printed slipcase wraps. Black cloth, dyed paper and solid-colored covering materials are different systems and must not be evaluated with CMYK values.
The Black Cover Specification at a Glance
| Element | Required specification | Reject this |
|---|---|---|
| Large black background | C40 M30 Y30 K100, 200% total ink, unless a job profile states otherwise | K100 alone, Registration color or an unapproved four-color mix |
| Small positive text | K100 only, normally overprinting | Four-color black body text |
| Fine black rules | K100 only | Rich-black hairlines built from four plates |
| Large display type | Same rich-black swatch as the surrounding large black artwork | A second visually similar black swatch |
| Maximum total ink | 240% for this laminated-cover workflow | Values above 240% hidden inside images, shadows or transparency |
| Image-to-layout join | One output profile and verified CMYK values; extend the image when possible | Eyedropper matching from an RGB preview |
| Matte surface | Anti-scratch matte film for full-bleed dark premium covers | Ordinary matte film approved only from an unused sample |
| Finishing schedule | Plan 48 hours before lamination; release only after drying tests pass | Laminating wet ink because the calendar says 24 hours have passed |
| Color approval | Finished laminated sample under controlled light | Approval from the monitor or raw press sheet alone |
These rules solve separate problems. Rich black increases visual depth over a large area. Single-plate black protects small text from registration halos. Ink limits protect drying and finishing. Anti-scratch film reduces visible handling damage. None replaces the others.
100K Black and Rich Black Have Different Jobs
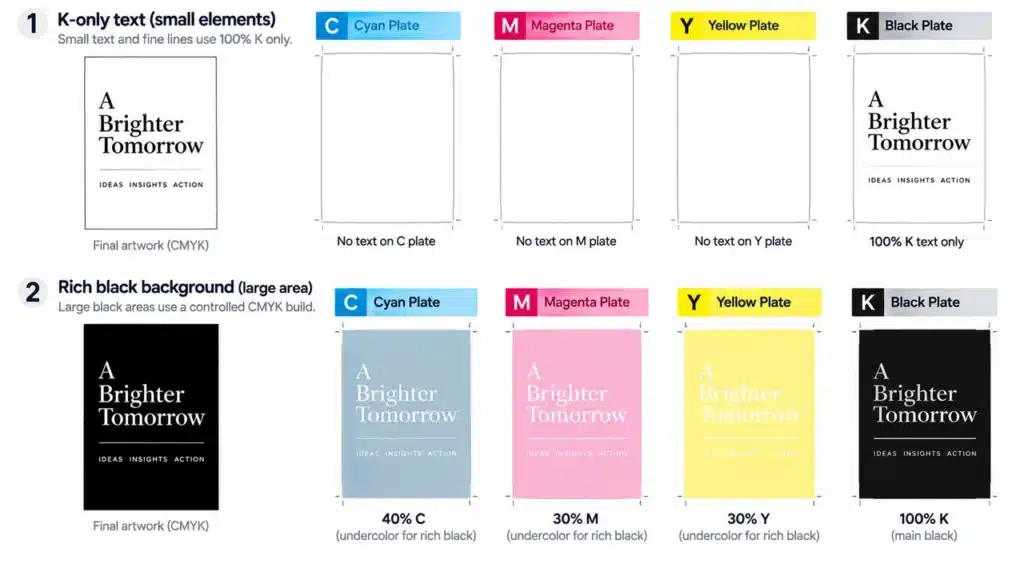
Use K100 for text, rules and machine-readable marks
Small black type must be built from one plate:
C0 M0 Y0 K100
That includes body text, captions, folios, legal text, fine rules, QR codes and barcodes. A one-plate element remains sharp even when the four process plates move slightly within normal press registration.
For this workflow, keep black text at 18 pt and below and rules at 0.5 mm and below as K100. Set ordinary positive black text to overprint unless the approved design requires a knockout. Adobe’s InDesign overprint guidance confirms that InDesign overprints its default 100% [Black] swatch automatically because this helps prevent white gaps caused by minor registration movement.
Do not use rich black for a barcode. Do not use Registration color for any live artwork. Registration color places 100% ink on every active plate and is reserved for production marks outside the finished piece.
Use rich black for broad visible surfaces
A large K100 panel can look less dense than expected because only one ink film creates the surface. Adding controlled cyan, magenta and yellow beneath the black increases opacity and gives a fuller neutral appearance.
For a new PrintPack360 cover without a prescribed output recipe, create one global swatch:
COVER_RICH_BLACK = C40 M30 Y30 K100
The total ink coverage is 200%, leaving practical headroom below the 240% cover limit for color-managed images and transitions. Adobe also lists C40 M30 Y30 K100 as a common neutral rich-black option in its InDesign trapping guidance.
Use this same swatch for every large black vector panel and large display element that is intended to match. Do not create Black 1, Black 2 and Almost Black swatches with slightly different values. A difference that appears harmless on screen can become an obvious panel on press.
Do Not Chase a Darker Black by Raising Total Ink
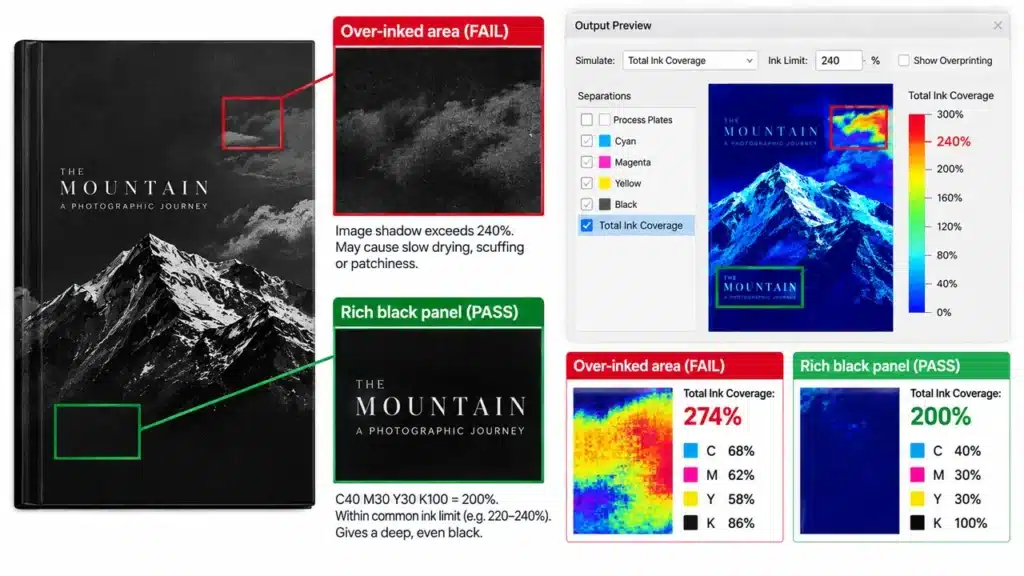
More ink stops improving the cover before it stops creating production risk.
Adobe’s Separations Preview documentation places typical maximum ink coverage between 240% and 320%, with the exact limit determined by the printer and output condition. A laminated book cover needs a conservative limit because the printed sheet must dry completely before film, adhesive, folding and case-making.
PrintPack360 therefore uses this hierarchy:
- Use the job-specific ICC profile and printer-issued PDF preset.
- If no lower limit is specified, cap total ink coverage at 240%.
- Use
C40 M30 Y30 K100for large neutral-black vector areas. - Correct image shadows through profile conversion or separation editing. Do not flatten them by replacing all dark pixels with one CMYK formula.
- Inspect the exported PDF in Separations Preview with the ink-limit warning set to 240%.
The lower limit always wins. If a selected uncoated paper or digital press requires 220%, use 220%. Never preserve a 280% shadow because it looked better on an RGB monitor.
What excessive ink actually causes
An over-inked black cover can produce:
- slow oxidative drying;
- setoff onto the back of the next sheet;
- blocking when sheets or finished books stick together;
- surface marking during cutting or folding;
- poor film adhesion;
- trapped solvent or moisture beneath lamination;
- color variation as operators fight an unstable ink film;
- loss of shadow detail rather than useful extra depth.
The correct response is not more spray powder. Excess powder can create pinholes, roughness and weak lamination adhesion. Correct the separation and drying conditions.
Match Image Blacks and Layout Blacks Before the PDF Leaves Prepress
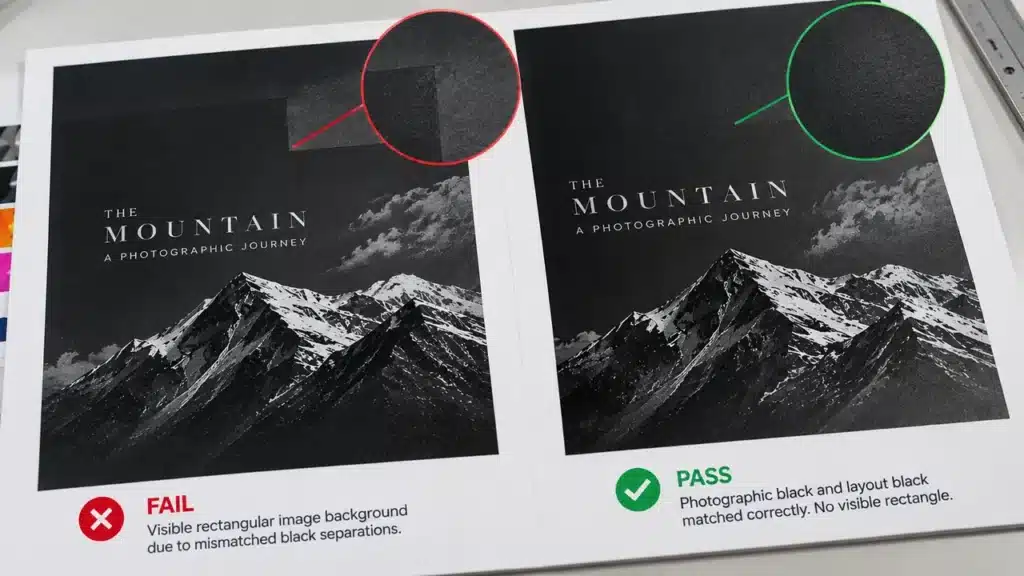
The classic failure is a photograph with a black background placed on a black InDesign page. The monitor appears seamless. The printed cover reveals a dark rectangle around the image.
This happens because the two black areas are not the same color construction. Common combinations include:
- an RGB image against a CMYK layout;
- an image converted with one ICC profile and a layout exported with another;
- a four-color image shadow against
K100vector black; - transparency blending in a different color space;
- two nominally identical swatches altered during PDF conversion.
Do not solve this by sampling the monitor with an eyedropper. The screen displays RGB light, not the final CMYK separations.
Use this production sequence instead:
- Set the document transparency blend space to CMYK.
- Convert or export all placed images through the approved output profile.
- Inspect the final PDF, not only the InDesign document.
- Use Acrobat Output Preview or InDesign Separations Preview to read the actual CMYK values on both sides of the join.
- Keep both areas below the approved total-ink limit.
- Where the composition allows it, remove the image’s artificial black background and let one layout black run behind the subject.
- If the black belongs naturally to the photograph, extend the image across the whole background instead of butting it against a separate vector panel.
The final two options are stronger than numerical matching because they remove the join.
PrintPack360’s guide to preparing hardcover book cover files explains how the CMYK artwork, template and separate finishing layers should be organized before export.
A Matte Black Cover Needs the Right Film, Not Just the Right Ink
A perfectly printed black sheet can still fail after finishing. Matte surfaces reveal polishing, fingerprints and directional scuffs more readily than gloss surfaces, especially across an uninterrupted dark panel.
For a premium full-bleed black cover, use anti-scratch matte lamination. Standard matte film is not the correct economy substitution for a dark collector edition that will be handled, packed and shipped internationally.
Derprosa recommends its anti-scratch matte film specifically for black and dark backgrounds. IBF’s anti-scratch matte-film data sheet similarly identifies anti-scratch BOPP matte film for book covers and premium packaging. These films improve resistance to visible marking, but the term does not mean scratch-proof. A decorated book can still be damaged by grit, sharp edges, tight slipcases or face-to-face rubbing inside a carton.
Use clean interleaving or protective wrapping when finished covers can rub during packing. Test slipcase insertion with the final film because repeated friction can polish even an acceptable surface. The dimensional and abrasion checks in How to Measure a Book for a Slipcase apply directly to dark laminated books.
For broader film choices, use PrintPack360’s lamination film guide for printed covers. For gloss contrast over black, the dedicated spot UV on matte black slipcases guide defines the mask, material and inspection rules.
Ink Must Be Dry Before Lamination
Do not release a heavy black sheet to lamination by elapsed time alone.
Celloglas’s technical finishing guidance states that ink must be fully dried and relatively wax-free before film lamination or UV varnishing. It gives 24 hours as a general minimum interval while warning that slow-drying ink can cause poor adhesion, setoff, blocking, piping and coating failure.
For a full-coverage rich-black book cover, PrintPack360’s production plan is stricter:
Reserve a 48-hour window between printing and lamination. Release the job only after the sheet passes setoff, rub and surface-tack checks.
Forty-eight hours is planning time, not an automatic approval. Cold conditions, heavy coverage, unsuitable ink, excessive fountain solution, non-absorbent stock or an unstable stack can require longer. If black transfers under the approved rub check, marks the facing sheet, feels tacky or blocks in the pile, the job remains on hold.
Never try to rescue wet black by laminating it. Film can hide the immediate rub but create adhesion failure, mottling or trapped contamination later.
Choose the Substrate Before Promising the Black
Smooth coated paper is the default for a printed premium black
A smooth coated sheet supports an even ink film, clean detail and consistent lamination. It is the correct default for a black printed paper case, dust jacket or slipcase wrap with photography, colored graphics, foil or spot UV.
Uncoated paper produces a different black
Uncoated paper absorbs more ink and scatters more light. The result is naturally softer and less optically dense. Do not attempt to force a coated-paper black onto an absorbent uncoated stock by exceeding the ink limit.
If a tactile uncoated surface is essential, approve the softer black as part of the design or move to a qualified dyed-through black stock with opaque decoration. This is a material decision, not a press correction.
Black cloth is not a printed-black substitute
Book cloth can provide a deep, durable base color without a four-color solid, but it cannot reproduce the same continuous-tone imagery as coated printed paper. The correct choice depends on the artwork. PrintPack360’s book cloth versus printed paper case guide makes that decision before finishing is specified.
When to Use a Spot Black Instead of CMYK Rich Black
Use a spot black when all three conditions are true:
- The cover depends on one large, highly consistent black field.
- The design contains little or no process-color imagery.
- The buyer will approve the extra plate, make-ready and production cost.
A dedicated spot black is valuable for minimalist black-and-white covers, brand-controlled packaging or a series that must hold one black appearance across multiple components. It is not automatically better for an image-heavy art book. Adding a fifth ink to a four-color photographic cover increases complexity and still does not solve poor color management inside the images.
For a CMYK art book, keep the cover in a controlled CMYK workflow unless the physical sample proves that a spot black is necessary. The process comparison in Five Major Printing Techniques Explained helps buyers separate ink choice from the wider printing method.
White Text Reversed Out of Rich Black Needs Its Own Rule
Positive black body text is safe as one-plate K100. White text reversed out of four-color black is different: all four plates must leave the same opening. Misregistration can create cyan, magenta or yellow fringes around the letters.
For white text on rich black:
- keep ordinary reversed text at 8 pt bold or larger;
- avoid very thin serifs and hairline counters;
- do not use four-color black behind tiny legal text;
- let prepress apply an appropriate choke or spread for the actual press condition;
- inspect the physical contract proof and press sheet with a loupe.
When tiny white text is mandatory, create a controlled K100 support zone behind it or redesign the area. Do not accept colored halos as an unavoidable feature of a premium cover.
The Proof Must Include Lamination
Raw ink and laminated ink are not the same approval surface. Film changes gloss, perceived density, contrast and sometimes color. Matte film can soften the apparent black; gloss film can deepen it; soft-touch and anti-scratch films have different haze and reflection.
Approve the project in this order:
- Color-managed contract proof: checks content, tone relationships and expected process color.
- Printed cover proof on production stock: checks the actual black separation and paper interaction.
- Laminated finish sample: checks the final black appearance, film adhesion and scuff behavior.
- Constructed book or slipcase sample: checks wrapped edges, folds, joints, rubbing and neighboring finishes.
The laminated sample is the color reference for the black surface. A screen screenshot, office-printer sample or unlaminated sheet cannot overrule it.
For color-critical work, measure and record a flat representative black patch on the approved laminated sample. Use that retained sample, measurement condition and instrument mode for the bulk comparison. A practical PrintPack360 target is Delta E00 no greater than 3 on the agreed flat control patch, with no visible panel-to-panel shift under standard viewing light. Visual defect criteria still apply; a low numerical difference does not excuse mottling, scratches or poor adhesion.
ISO 12647-2 defines process-control parameters for four-color sheet-fed and web offset production. The standard provides a disciplined printing condition; the signed physical sample defines this job’s final laminated appearance.
A Real Black Slipcase Decision
An anonymized PrintPack360 art-book project required a black slipcase carrying white and vivid pink graphics, a bright pull ribbon and selective gloss UV. Cloth was rejected because it could not reproduce the graphic system or provide a clean base for the intended gloss contrast. The production route moved to a printed-paper wrap over rigid board.
That decision did not end with selecting “black.” The black field, colored graphics, matte surface, spot UV and slipcase construction had to be approved as one object. A raw flat sheet could not prove whether the gloss pattern would read under directional light or whether the finished book would rub the dark interior during insertion.
The full decision sequence is documented in the custom art book printing case study. Buyers planning a similar project can also review PrintPack360’s hardcover art book printing and custom book slipcase production routes.
Defect Diagnosis: Correct the Cause, Not the Symptom
| Visible defect | Most likely production cause | Required action |
|---|---|---|
| Large black looks grey | K100 used over a broad area or unsuitable absorbent stock | Replace with approved rich black or change material; do not simply raise press density |
| Black is brown, blue or green | Unbalanced CMY undercolor or inconsistent swatches | Return to one neutral rich-black swatch and verify separations |
| Photo appears inside a black rectangle | Image black and layout black use different profiles or CMYK values | Remove the join, extend the image or rebuild both through one output workflow |
| Colored halo around black text | Small type built from four plates | Rebuild as K100 only and verify overprint |
| Underlying artwork shows through black | Large K100 object is overprinting | Use rich black and the correct knockout/overprint instruction for the object |
| Ink marks the facing sheet | Incomplete drying, excess ink or stack pressure | Stop finishing, correct drying conditions and retest |
| Film lifts or shows silvering | Wet/contaminated ink, excess powder, rough surface or poor film compatibility | Reject the finish, correct the surface system and produce a new qualified sample |
| Matte black shows shiny scratches | Standard matte film, dirty handling or abrasive packing | Use anti-scratch film and improve interleaving, fit and packing |
| Black changes around foil or spot UV | Finish, film and base ink approved separately | Reapprove the complete decorated construction under final viewing conditions |
| Black differs from batch to batch | No retained target, inconsistent output condition or undocumented substitution | Stop comparing by memory; use the signed laminated reference and recorded process condition |
Preflight Checklist for a Deep Black Cover
Before the production PDF is approved, confirm every item:
- One global swatch named
COVER_RICH_BLACKis used for intended large neutral-black vector areas. - The default build is
C40 M30 Y30 K100, unless the job specification provides another recipe. - Positive text at 18 pt and below is
K100only. - Fine rules at 0.5 mm and below are
K100only. - No live object uses Registration color.
- Image and document profiles follow the supplied output condition.
- Transparency blend space is CMYK.
- Ink-limit preview shows no area above 240%, or the lower job-specific limit.
- Overprint Preview has been checked for hidden artwork and unexpected color mixing.
- Black image backgrounds do not create visible joins with vector backgrounds.
- White reversed text is large and robust enough for four-plate registration.
- The PDF contains no duplicate near-black swatches or unintended spot colors.
- The selected lamination is named in the purchase specification.
- A 48-hour finishing window is in the production schedule for heavy black coverage.
- The approval plan includes a laminated sample and a finished constructed sample.
Bulk Inspection Standard
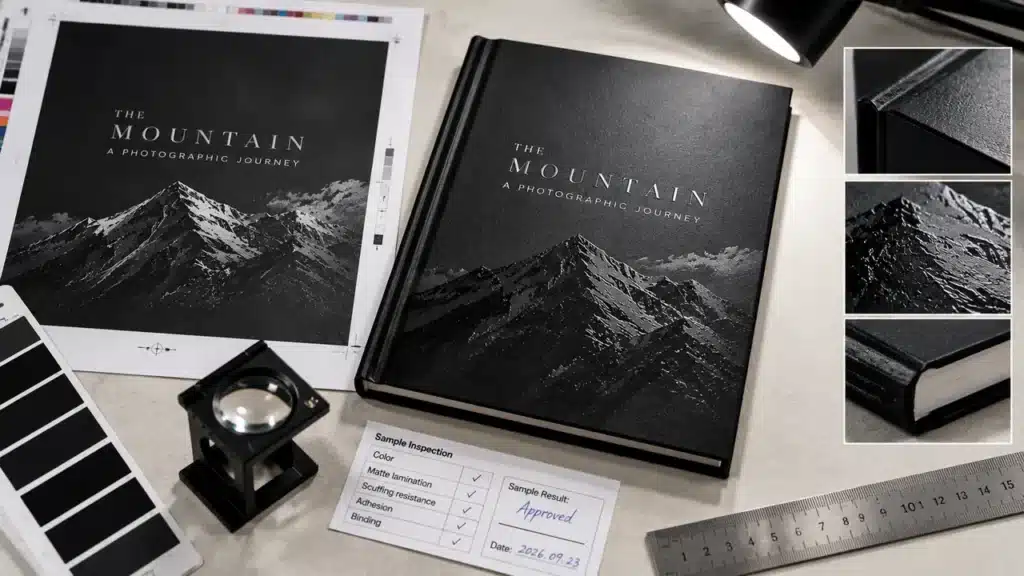
Inspect black covers after lamination and after construction. Use diffuse standard viewing light for overall color and directional light for scuffs, gloss variation and surface defects.
Accept only when:
- the black field is visually even across front, spine and back;
- no image box, banding, mottling, hickeys or streaks are visible at normal reading distance;
- no setoff, blocking or rub transfer is present;
- lamination shows no bubbles, silvering, lift or edge separation;
- dark surfaces have no repeated directional scratches or polished handling paths;
- small black text is sharp and free from colored registration halos;
- reversed text has clean counters and no objectionable color fringe;
- foil, spot UV and embossing do not expose adhesion failure in the surrounding film;
- the result matches the signed laminated reference under the agreed light;
- the retained constructed sample carries the approved revision and date.
Do not classify a repeating scuff, image box or adhesion defect as an acceptable “industry tolerance.” A repeated process defect is a production failure and must be corrected before shipment.
What to Send for an Accurate Quote
For a black custom hardcover book printing project, send:
- finished size, page count, quantity and delivery destination;
- binding style and board thickness;
- cover paper or covering material;
- percentage of the cover occupied by solid black;
- intended matte, anti-scratch, soft-touch or gloss film;
- foil, spot UV, embossing or debossing requirements;
- production PDF and editable source package;
- required output profile, if your brand controls one;
- physical color reference or Lab target for critical black;
- packing and retail-handling requirements;
- the defect that the project cannot tolerate.
The last item forces a useful decision. If visible scuffing is unacceptable, anti-scratch film and protective packing are mandatory. If the black must match across a book and slipcase, both components belong in one proofing plan. If tiny white text cannot change, prepress must engineer the surrounding black around it.
FAQ
Is 100% K black enough for a large book-cover background?
No. Use K100 for small text and fine rules. Use the approved rich-black swatch for a broad printed background. On PrintPack360 offset-printed coated covers, the default is C40 M30 Y30 K100.
Should black body text use the same rich black as the cover background?
No. Body text must remain C0 M0 Y0 K100. Four-color body text can produce cyan, magenta or yellow fringes when the plates move slightly. Keep it on one plate and verify that it overprints correctly.
How long should a heavy black cover dry before lamination?
Plan a 48-hour finishing window. Release the sheet only after it passes setoff, rub and tack checks. Do not laminate wet ink at 24 or 48 hours merely because the scheduled time has elapsed.
Why does a matte black cover show scratches so easily?
Dark low-gloss surfaces reveal polished marks and directional abrasion. Use anti-scratch matte film, clean handling, suitable interleaving and a slipcase fit that does not scrape the cover. Standard matte film is not acceptable for a premium full-bleed dark cover.
“Why do my black-background images print as visible boxes?”
The image black and page black have different separations. They may use different color spaces, ICC profiles or CMYK values. Remove the join by using transparency or extending the image. If a join is unavoidable, convert through one output profile and verify both sides in the exported PDF’s Output Preview.
“What CMYK values should I use for rich black?”
Use the printer’s job-specific recipe. When none is supplied for a PrintPack360 coated offset cover, use C40 M30 Y30 K100. Keep the complete PDF at or below 240% total ink coverage. Do not copy an aggressive formula from an unrelated press condition.
“Can I use Registration black to get the deepest possible black?”
Never. Registration color prints at 100% on every active plate and exists for crop marks and other production controls. Using it in live artwork creates excessive ink and can cause drying, setoff and finishing failures.
“Why does my black cover look good before lamination but lighter afterward?”
Matte film changes reflected light and reduces apparent contrast. The raw press sheet was the wrong final approval surface. Approve color on the specified laminated stock, retain that physical sample and compare bulk production against it under the same lighting condition.
Final Specification
A premium black book cover is not “as black as possible.” It is a controlled surface that remains neutral, even, dry, bonded and presentable after handling.
Use one rich-black swatch for large panels. Keep small black text on the K plate. Enforce the ink limit in the exported PDF. Give the ink enough verified drying time. Use anti-scratch film on premium dark matte work. Approve the color after lamination and inspect the finished object, not an isolated sheet.
Those decisions produce a deeper black with fewer defects than simply increasing ink.