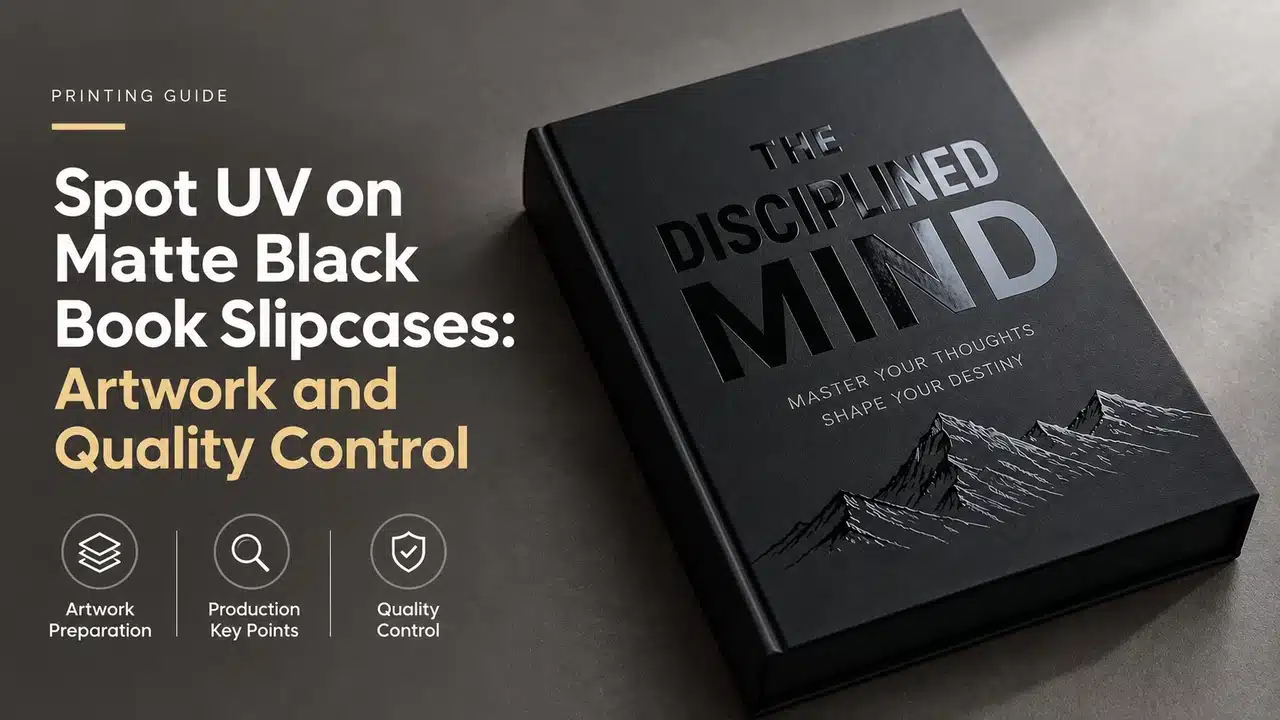
Place a matte black slipcase flat on a desk and its gloss pattern may almost disappear. Tilt it toward a light source and the same pattern becomes the first thing you see.
That change is the purpose of spot UV on matte black. The effect is not another printed color. It is controlled reflected light: a clear gloss coating over selected areas of a low-gloss surface.
For book packaging, the most reliable construction is specific:
Use a smooth printed-paper wrap, scratch-resistant matte lamination and flat gloss spot UV, applied before the sheet is wrapped over rigid board.
Do not specify this effect directly on open-weave book cloth. Do not place it across wrapped edges. Do not submit the UV area as a note in an email. Build it as a separate production separation and approve the finished surface under directional light.
This guide defines the artwork and quality-control rules for a spot UV book slipcase. It focuses on conventional flat gloss UV over a matte-laminated printed wrap. Raised UV, uncoated paper and cloth require different decisions and are treated separately below.
Table of Contents
The Recommended Slipcase Construction
| Layer | Production specification | Purpose |
|---|---|---|
| Structural core | Rigid greyboard selected for the size and loaded book weight | Shape and resistance to crushing |
| Outer wrap | Smooth coated paper with the complete printed artwork | Uniform black and accurate graphics |
| Surface film | Scratch-resistant matte lamination | Low-gloss ground and handling protection |
| Selective finish | Flat gloss spot UV on named artwork only | Gloss contrast and selective emphasis |
| Inner surface | Suitable lining or finished wrap based on fit and abrasion risk | Clean insertion and controlled friction |
The matte film protects the whole printed wrap. The spot UV does not replace that protection. Its primary job is visual and tactile emphasis.
This construction is available within PrintPack360’s custom book jacket and slipcase box set options. The slipcase dimensions must still be based on the finished book, not a generic packaging template.
What Spot UV Is, and What It Is Not
Spot UV is a transparent liquid varnish applied to selected areas and cured with ultraviolet energy. On a matte-laminated black surface, it produces a black-on-black effect because the coated and uncoated zones reflect light differently.
It is not:
- A black ink used to darken the logo
- A substitute for matte lamination
- A guarantee against scratching
- An embossing process
- Automatically raised or strongly tactile
- Visible from every angle under every lighting condition
Standard flat spot UV creates a smooth gloss change. Raised spot UV uses a heavier deposit to create a visible height. For a fitted book slipcase, flat spot UV is the default choice because it is easier to wrap, less exposed to abrasion and less likely to affect clearance.
Use raised UV only on an outward-facing flat panel. Keep it off insertion edges, inner contact surfaces and any area that bends around board.
For a wider comparison with foil, debossing and decorated edges, use PrintPack360’s hardcover book finishing guide. This article addresses the narrower production question of getting one finish right.
Start With the Correct Base Surface
Use smooth printed paper with matte or anti-scratch lamination
A clean gloss-versus-matte effect needs a smooth, non-absorbent and consistent surface. Matte-laminated coated paper provides that base. For dark slipcases, use scratch-resistant matte film because ordinary matte surfaces can show shiny handling marks and scuffs.
The surface still has to be tested as a system. The varnish, film treatment, printed ink and curing method must be compatible. A coating that adheres to one matte film can fail on another film with different surface chemistry.
Celloglas’s technical guidance identifies fully dried, relatively wax-free inks and good surface wettability as prerequisites for UV varnishing. Excess wax, silicone, spray powder or insufficiently dried ink can cause pinholes, reticulation, weak adhesion or varnish shelling.
Reject open-weave cloth for this visual brief
Do not use conventional gloss spot UV directly on coarse or open-weave book cloth when the goal is a clean black-on-black logo. The weave interrupts the coating, weakens edge definition and produces uneven gloss.
For cloth, choose one of three processes instead:
- Foil stamping for a clean reflective mark.
- Blind debossing for a restrained tactile mark.
- A printed or foil-stamped label mounted onto the cloth.
The choice between cloth and printed paper should follow the artwork. PrintPack360’s guide to book cloth versus printed paper cases explains why a material is not premium if it prevents the design from being reproduced properly.
Do not apply conventional spot UV to an absorbent uncoated wrap
An absorbent sheet pulls varnish into the surface and reduces gloss, edge sharpness and coating uniformity. Celloglas explicitly advises against absorbent surfaces for UV varnishing. If an uncoated appearance is essential, use a qualified varnishable stock, a clear pre-coat or another finish proven on that exact paper.
For a new book slipcase, the firm recommendation remains: smooth coated wrap plus matte lamination plus gloss spot UV.
Seven Artwork Rules That Prevent Most Spot UV Failures
1. Create a separate UV separation
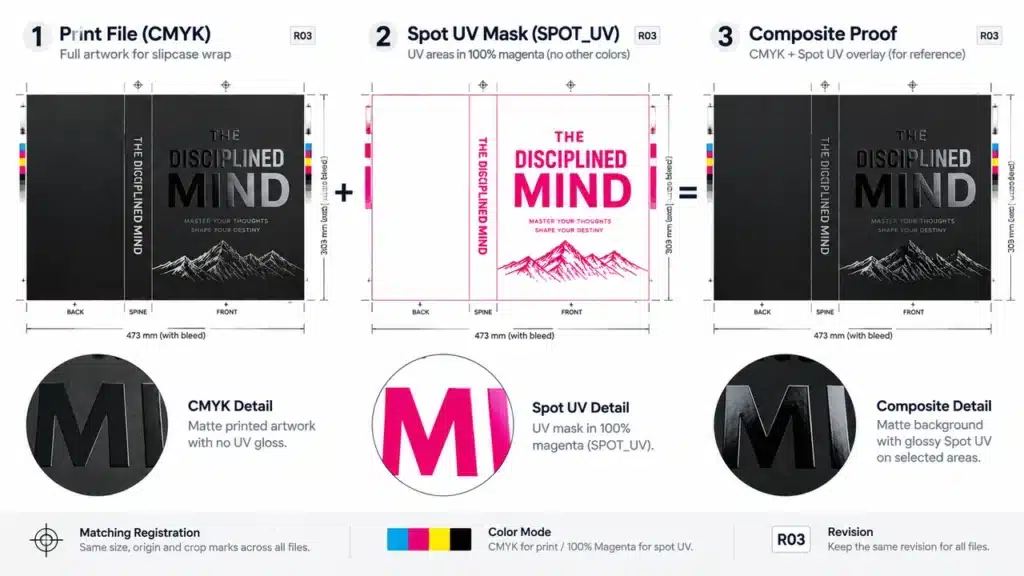
Supply the print artwork and the UV artwork as separate production elements. The UV file must have exactly the same page size, bleed, origin and orientation as the printed slipcase wrap.
Use one named spot color: SPOT_UV. Set every UV object to 100% of that spot color and set it to overprint. The color shown on screen is only a production identifier; the applied varnish is clear.
2. Use vector artwork
Logos, type, rules and patterns must be vector objects. Do not build the UV mask from a low-resolution JPEG, a blurred Photoshop selection or a screenshot.
If a photographic shape must receive UV, create a clean vector silhouette or supply a 1-bit high-resolution mask approved by the printer. For normal book-slipcase graphics, vector is the correct default.
3. Use a 1 mm minimum line and gap
For a new conventional spot UV design, keep positive lines, reversed gaps and isolated details at least 1 mm wide. Do not send hairlines.
Ridderprint’s published spot UV artwork instructions use the same 1 mm minimum for lines and recesses. A specific production line may demonstrate finer capability, but that must be proven by a finish test before the artwork is reduced.
4. Keep standard UV 3 mm away from wrapped edges; keep raised UV 5 mm away
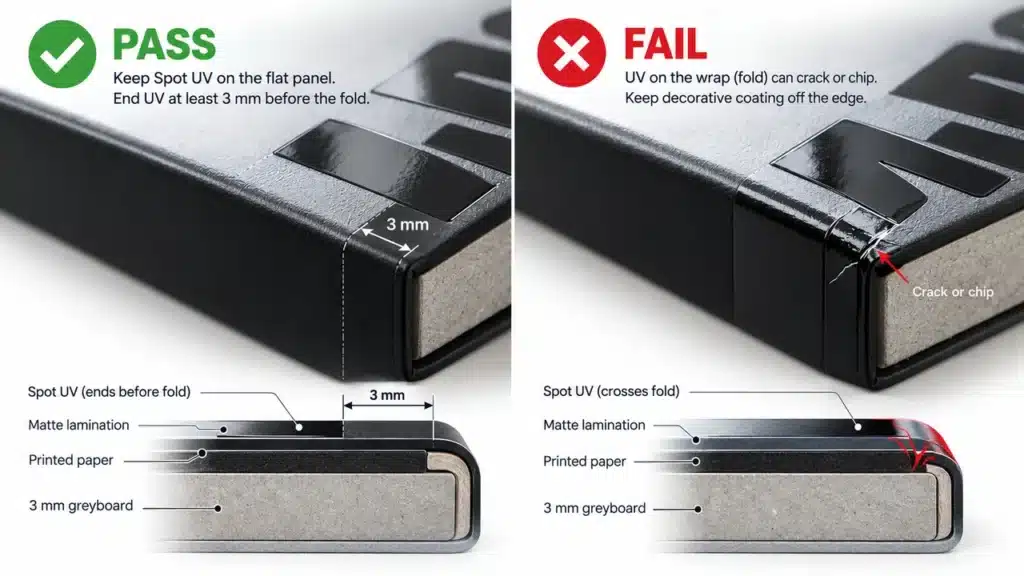
The flat sheet is coated before it is turned around board. Varnish placed on the bend can crack or chip, and a heavy UV deposit makes that risk worse.
Use these conservative slipcase rules:
- Flat spot UV: no important UV artwork within 3 mm of a wrap or fold line.
- Raised spot UV: no UV within 5 mm of a wrap, fold, cut or board edge.
- No UV on the inside edge where the book rubs during insertion.
Celloglas advises keeping UV away from folds, creases and trimmed edges because decorative varnishes can crack when folded or cut. The extra clearance above converts that principle into a usable slipcase artwork rule.
5. Inset UV that registers to printed shapes
When gloss UV sits inside a printed letter, icon or color field, inset the UV mask by 0.5 mm from the printed boundary. The printed shape then acts as a trap and absorbs small registration movement.
Do not make two identical hairline boundaries and expect them to remain invisible across a production run. If the UV must align exactly to fine typography, simplify the artwork or enlarge the printed base shape.
6. Do not use gradients, opacity or soft shadows in a screen UV mask
Conventional screen spot UV is a binary instruction: coating or no coating. Use solid shapes. A 40% tint in the mask does not reliably mean 40% gloss.
If the design requires variable height, texture or tonal varnish, specify a qualified digital embellishment process and provide files for that equipment. Do not send a conventional UV file and expect the processor to infer a raised or variable effect.
7. Supply a composite proof
In addition to the print PDF and UV-only PDF, supply one composite page showing the UV mask over the printed artwork in a conspicuous temporary color. Label it POSITION REFERENCE - NOT PRINT COLOR.
The composite prevents three common errors: an inverted mask, a shifted origin and UV applied to the wrong artwork version.
The Correct Black-on-Black File Strategy
For a logo that should appear only when the slipcase moves in the light, print one uniform black background and place the logo only in the UV separation.
Do not print the logo in grey beneath the varnish. The grey creates a visible tonal logo even when the gloss reflection disappears, weakening the hidden-reveal effect.
Use a grey or second black value beneath the UV only when the logo must remain readable in flat, diffuse light. That is a different design objective and should be shown in the approved printed proof.
The correct black build must come from the printer’s output condition. Do not invent an extremely heavy CMYK rich black. Excess total ink can slow drying and contribute to finishing problems. Use the supplied profile or printer-approved black recipe, then approve the printed and laminated sample.
Production Order: Print, Protect, Decorate, Then Wrap
The sequence for a printed-paper rigid slipcase is:
- Print the outer wrap.
- Allow the ink to dry fully.
- Apply scratch-resistant matte lamination.
- Condition the laminated sheets.
- Screen or otherwise apply the registered spot UV.
- Cure the varnish completely.
- Inspect adhesion, gloss, registration and surface defects.
- Wrap the finished sheet over the rigid-board structure.
- Assemble one complete slipcase and test it with the finished book.
- Release bulk assembly only after the constructed sample passes.
Do not judge adhesion immediately after the coating exits the machine. Marabu’s UV-varnish technical data states that post-curing varnishes reach final adhesion and resistance after 24 hours. Our recommended inspection point is therefore after a minimum 24-hour cure, followed by construction and fit testing.
The finished book must exist before the final enclosure is approved. Our guide to measuring a book for a slipcase explains how case thickness, jacket or wrap, clearance and surface friction affect fit.
A Real Art Book Decision: Spot UV Was Not the First Problem
In a recent PrintPack360 custom art book printing case study, an Australian creative client wanted a black slipcase with white and vivid pink graphics, a bright pink pull ribbon and spot UV.
The first material idea was black cloth. We rejected it for the final design because the available pink foil could not reproduce the artwork convincingly and conventional printing on that cloth would weaken the white-and-pink graphic language. The production slipcase therefore moved to a printed-paper wrap over heavy board, with scratch-resistant matte lamination and spot UV.
The temporary slipcase confirmation sample did not include the spot UV. That omission was stated before approval. The sample approved the structure, proportions and spine treatment; a separate marked file approved the UV position for production.
This distinction is important: a sample without spot UV cannot approve the finished gloss, adhesion or registration. It can approve only the attributes it physically represents and the location shown in a separate proof.
When Spot UV Is the Right Finish
| Design requirement | Decision |
|---|---|
| Subtle black-on-black logo on a smooth matte slipcase | Use flat gloss spot UV |
| Highly visible metallic title from every viewing angle | Use foil, not spot UV |
| Tactile mark on cloth | Use blind debossing or foil |
| Raised droplets, scales or texture on an outward flat panel | Use tested raised UV with a 5 mm edge exclusion |
| Fine hairline illustration below 1 mm | Redesign or use another process |
| Gloss area crossing a wrapped edge | Move it onto the flat panel |
| Whole panel needs gloss | Use gloss lamination or flood coating, not spot UV |
| Slipcase will rub tightly against the decorated area | Change the finish location or increase clearance |
Spot UV is the correct answer when selective reflection carries the design. It is the wrong answer when the mark must remain equally visible under all light or when the chosen material cannot support a clean coating.
Approval Standard for a Matte Black Spot UV Slipcase
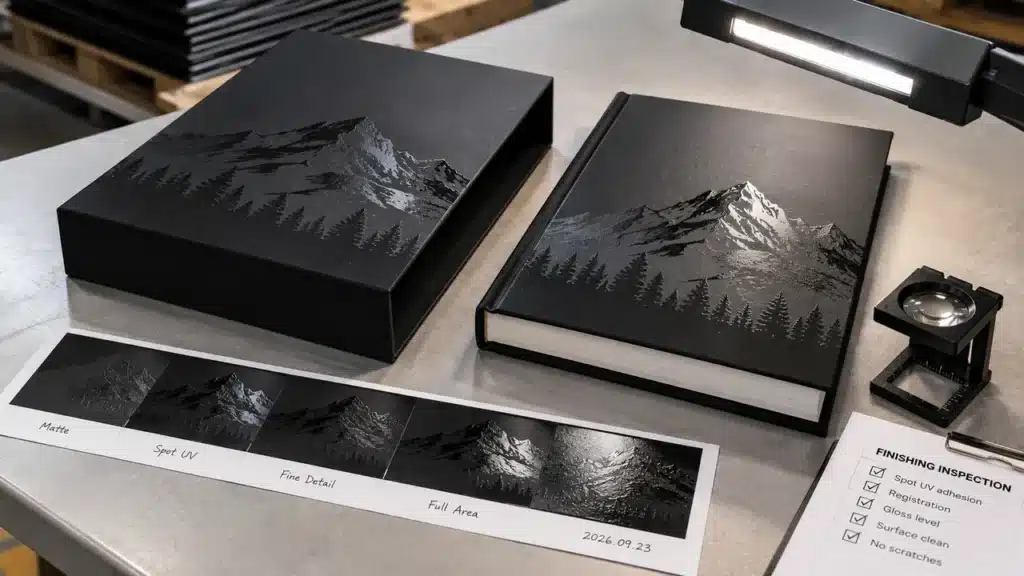
Approve one finished, constructed reference under the same conditions that will be used for bulk inspection. “Looks premium” is not an acceptance standard. Use observable criteria.
Artwork and registration
- UV appears on the approved elements only.
- The orientation matches the composite proof.
- UV remains inside registered printed shapes and does not cross their visible boundaries.
- No missing sections occur in 1 mm lines, type counters or approved small details.
Coating surface
- No pinholes, fisheyes, reticulation, bubbles or shelling are visible at normal reading distance.
- Broad UV areas have uniform gloss without obvious streaking or patchiness.
- Matte areas remain clean and are not contaminated by stray varnish.
- The coating does not block or stick when finished sheets are stacked.
Adhesion and cure
- Evaluate adhesion after at least 24 hours, not immediately after curing.
- Test a retained waste strip or production control area; do not damage the customer’s approved sample.
- Reject varnish that lifts, flakes or scratches away under the agreed shop adhesion check.
- Record the film, varnish and cure setup used for repeat orders.
Constructed slipcase
- No UV crosses or cracks at wrapped edges.
- The decorated panel remains flat without visible board or adhesive distortion.
- The finished book can be inserted and removed ten times without the book rubbing the UV area.
- The pull ribbon does not drag across or mark the coated panel.
- The approved contrast is visible when the slipcase is tilted approximately 30-45 degrees under directional light.
Where a numerical gloss target is commercially necessary, measure retained flat samples rather than a distorted assembled edge. ISO 2813, confirmed current in 2025, specifies 20-degree, 60-degree and 85-degree methods for gloss measurement on plane, opaque, non-textured coatings. Record the selected geometry and approved range before production; do not invent a gloss-unit target after delivery.
Defect Diagnosis: What the Failure Tells You
| Visible defect | Most likely production cause | Required action |
|---|---|---|
| Pinholes or small uncoated dots | Poor wettability, wax, silicone, spray powder or contaminated film | Stop; clean or change the surface system and rerun the adhesion test |
| Varnish pulls away into islands | Reticulation from incompatible or insufficiently prepared surface | Reject the sheet; do not hide it through heavier coating |
| UV peels or shells off | Weak adhesion, incomplete cure or incompatible laminate | Hold production and requalify film, varnish and cure conditions |
| Gloss edge visibly misses printed logo | Mask alignment error, sheet distortion or insufficient trap | Correct registration and enlarge/inset the mask |
| Cracking at a board edge | UV was placed in a wrap zone or deposit was too heavy | Remove UV from the bend and remake the wrap |
| Patchy broad gloss | Uneven coating deposit, surface contamination or unsuitable artwork coverage | Rework the process; do not approve from a favorable camera angle |
| Scuffed matte field around good UV | Base film lacks required handling resistance or packing allows rubbing | Upgrade to anti-scratch film and correct packing contact |
A camera can conceal these defects by changing the angle. Approval video should move the sample slowly through the light and include a fixed close-up of the same area.
Spot UV File Delivery Checklist
Send the following files as one controlled package:
PROJECT_SLIPCASE_PRINT_R03.pdf– final CMYK print artworkPROJECT_SLIPCASE_SPOT_UV_R03.pdf– UV objects only, vector, 100% named spot colorPROJECT_SLIPCASE_COMPOSITE_R03.pdf– visible position reference- Printer-issued slipcase dieline with revision number
- Written note confirming flat or raised UV
- Approved matte or anti-scratch film reference
- Final book dimensions and slipcase fit approval
- One list of open issues and declared sample substitutions
The revision suffix must match across all three artwork files. If the print file changes from R03 to R04, the UV and composite files must also be regenerated and renamed R04. Never combine a new print PDF with an old UV mask.
PrintPack360’s sample strategy can be used to define whether the next approval should be a material swatch, finish test, constructed sample or retained production reference.
FAQ
Should spot UV be applied over matte lamination?
Yes. For a matte black printed-paper slipcase, apply gloss spot UV over a qualified matte or scratch-resistant matte laminate. The film creates the stable low-gloss surface and protects the full wrap; the UV supplies selective contrast.
Can spot UV be applied directly to book cloth?
Do not use it for a clean black-on-black logo on open-weave cloth. Use foil, blind debossing or a mounted label. Spot UV belongs on a smooth, tested and non-absorbent surface.
Does spot UV protect the slipcase from scratches?
No. Spot UV protects only the coated artwork area and is primarily decorative. Specify scratch-resistant matte lamination for the full outer wrap and packing that prevents surfaces from rubbing.
Can I approve spot UV from a PDF or a sample that has no varnish?
No. A PDF can approve the mask position, and an unfinished sample can approve structure. Only a production-representative physical finish can approve gloss, adhesion, registration and tactile effect.
How should I set up a spot UV file in InDesign or Illustrator?
Create a separate layer and named spot-color swatch called SPOT_UV, fill all UV objects at 100%, set them to overprint and export a PDF at exactly the same size and origin as the print artwork. Supply a UV-only file and a composite position proof.
Should a black-on-black UV logo be printed in grey underneath?
No, not when the intended effect is a logo revealed only by gloss. Print a uniform black field and place the logo only in the UV mask. Use a grey underprint only when the logo must remain visible without reflected light.
Is raised spot UV better than standard spot UV?
No. Standard flat spot UV is the correct default for book slipcases. Raised UV is appropriate only when tactile height is a deliberate design feature on a protected flat panel; it needs wider edge clearance and creates more abrasion and fit risk.
Why does spot UV peel, develop pinholes or look uneven?
The surface system is incompatible or contaminated. Common causes are wax, silicone, excessive spray powder, incomplete ink drying, low surface wettability, inadequate cure or an unsuitable lamination film. Stop production, correct the material/process combination and test again after 24 hours.
Specify the Surface as One System
The purchase specification should not say only “black slipcase with spot UV.” State the wrap paper, black printing condition, matte-film type, UV type, UV file revision, safety zones, approved physical reference and inspection method.
For a new hardcover art book or collector edition, send the finished book specification and slipcase artwork together. PrintPack360 can review the surface finish alongside fit, ribbon position, packing and international shipment before the enclosure enters production.