
A slipcase can be structurally sound and beautifully wrapped, yet still fail at the moment the reader tries to remove the book.
If the fit is too tight, the case may scrape a dust jacket, polish a matte surface or require an awkward pull on the spine. If it is too loose, the book can lean, knock against the walls or slide out when the set is handled. With two or three volumes, small variations accumulate and turn an apparently sensible calculation into a poor fit.
The common shortcut is to take the stated book height, width and spine thickness, then add a fixed allowance. That is not a dependable way to engineer a premium enclosure.
The better answer to how to measure a book for a slipcase is:
Measure several representative finished books in their final retail condition, record the largest relevant dimensions, then approve the working clearance through a physical fit sample made with the intended board, lining and wrap.
PrintPack360’s custom book jacket and slipcase set is the main product route for single- and multi-volume hardcover projects. This guide focuses specifically on the dimensional work that should happen before the slipcase dieline and bulk materials are released.
First Decide What the Slipcase Must Hold
Do not begin with a ruler. Begin with the exact object that will enter the case.
The enclosure may need to hold:
- one bare clothbound hardcover;
- one printed casebound book with a dust jacket;
- a book with a jacket plus an acetate or paper belly band;
- two or more volumes in a fixed order;
- books separated by board or paper dividers;
- a book and a slim companion booklet;
- shrink-wrapped books loaded before retail fulfillment;
- a numbered edition with a certificate or print portfolio.
These are not interchangeable measurement targets. A jacket changes the outer dimensions and friction. A folded belly band can create localized thickness. Raised foil or embossing may become a contact point. Shrink film can tighten across corners and alter insertion behavior. A loose certificate placed beside a book may buckle unless it has a defined compartment.
Write one sentence before measuring:
The slipcase will be fitted to [exact contents] in [exact loading order and retail condition].
If that sentence is unclear, the dimensions are premature.
The Three Dimensions to Record
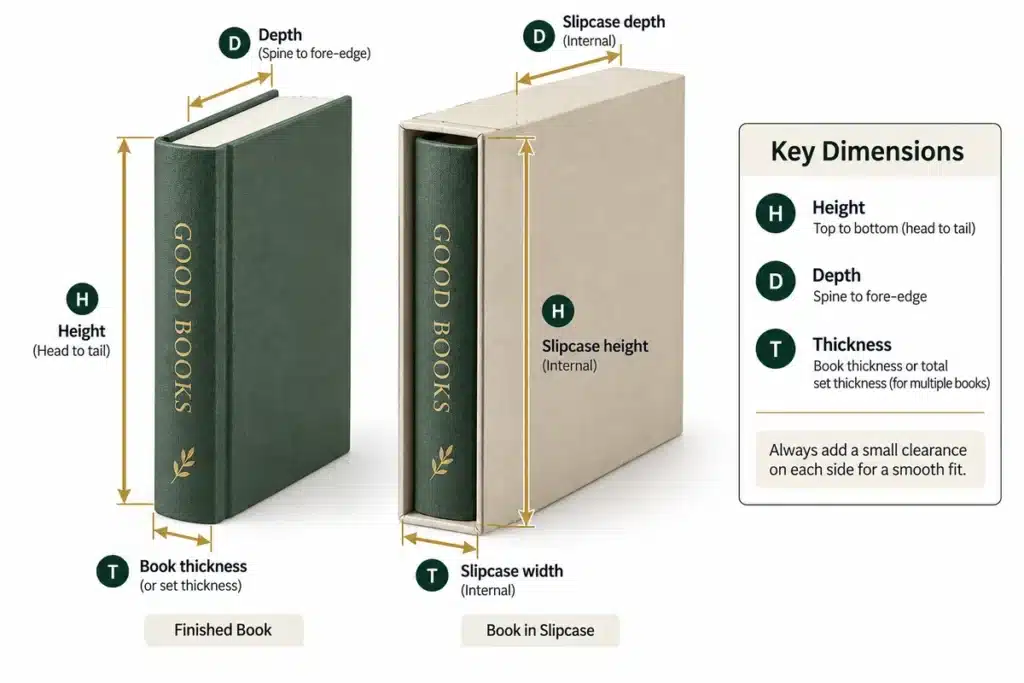
For a conventional open-front slipcase, measure the finished contents in three directions.
| Dimension | What to measure | Common mistake |
|---|---|---|
Height (H) | Greatest finished height from head to tail | Using text-page trim instead of the projecting cover boards |
Depth (D) | Greatest distance from the spine side to the fore-edge side | Measuring only the page width or ignoring jacket folds and board projection |
Set thickness (T) | Greatest total thickness across the book or complete ordered set | Using the artwork spine width or adding nominal spine widths from separate files |
Use the words height, depth and set thickness consistently on drawings and purchase documents. “Width” can mean fore-edge depth to one team and total opening width to another. A labeled orientation sketch removes that ambiguity.
For multi-volume sets, H and D come from the tallest and deepest actual volumes. T is measured across the complete set in its intended order, including jackets, dividers or wraps.
These are content dimensions, not the finished outside dimensions of the slipcase. The manufacturer still has to engineer the board construction, lining, wrap and working clearance.
Use the Finished Book, Not the Nominal Specification
A 170 x 240 mm book specification normally refers to the trimmed text block or intended finished format. It does not fully describe the external object.
A casebound book usually has boards that project beyond the pages. The spine may be rounded. The jacket adds folds and surface layers. Cloth, PU, lamination, foil and debossing change friction and sometimes local thickness. The book may also settle or condition after binding.
Measure from a representative finished unit after:
- final paper and page count are confirmed;
- the production binding structure is used;
- the case boards and covering material are final;
- casing-in is complete;
- the dust jacket, belly band or retail wrap is fitted;
- surface finishes are applied;
- the book has had appropriate time to condition;
- any planned individual wrapping is included or explicitly excluded.
If the finished book does not yet exist, an early dummy can establish approximate proportions and quotation volume. The slipcase dimensions should remain provisional until a production-representative book is available.
The underlying relationship between boards, book block, spine, joints and squares is explained in Hardcover Book Structure Explained. Those parts are the reason nominal trim size and external case size are not the same.
A Practical Measuring Method
The measuring method should avoid squeezing a soft jacket or forcing a rounded spine into an artificial rectangular dimension.
What you need
- A flat, level work surface
- A rigid vertical backstop or two engineer’s squares
- A reliable metric ruler or caliper appropriate to the object
- A second square or flat plate for reading the maximum dimension
- A measurement sheet identifying each sample
- Several representative books where possible
Do not rely on a flexible tape measure wrapped around the book. It is useful for rough planning but poor at locating maximum external dimensions.
Measure height
Stand or place the book so one end rests squarely against the flat surface. Bring a square or flat reference gently to the opposite end. Read the greatest distance without compressing the jacket or case.
Measure near the spine, center and fore edge. Boards and jackets are not always perfectly parallel, so use the highest stable reading.
Measure depth
Place the spine side against a vertical backstop and bring the second square to the furthest fore-edge point. Repeat at the head, center and tail.
For a rounded spine, do not substitute the flat cover-board width. The finished outer curve and jacket may extend differently. Record the maximum natural dimension of the complete book.
Measure thickness
Lay the book flat without hand pressure. Use parallel references to identify the thickest external point. Measure at several positions because a rounded spine, board warp, jacket fold or raised decoration can create a local maximum.
For a multi-volume set, place the books together in the intended loading order. Let them rest naturally. Do not squeeze the set to reach the theoretical sum of the artwork spine widths.
The Northeast Document Conservation Center similarly recommends measuring height, width and thickness at several points and using the highest reading when ordering custom enclosures. Its guidance is written for preservation boxes rather than retail slipcases, but the measurement principle is directly useful. NEDCC: Custom Protective Enclosures
Measure More Than One Book
One sample tells you whether one book can fit. It does not reveal production spread.
Where practical, measure several units drawn from representative stages or positions in the book run. Record each unit separately rather than averaging immediately.
| Sample ID | Height | Depth | Thickness | Jacket or wrap condition | Notes |
|---|---|---|---|---|---|
| Book A | Final jacket fitted | ||||
| Book B | Final jacket fitted | ||||
| Book C | Final jacket fitted | ||||
| Book D | Final jacket fitted | ||||
| Maximum observed | Use as the dimensional input, not as the automatic dieline |
The measurement record should include:
- project and edition name;
- book revision or batch;
- sample IDs;
- measurement date;
- measuring tool;
- whether the book was jacketed, wrapped or shrink-wrapped;
- loading order for sets;
- highest observed
H,DandT; - visible warp, compression or unusual local build-up.
Do not hide an outlier without understanding it. It may be a defective book, a measurement error or a real process variation that the enclosure has to tolerate. The production team should decide which explanation applies.
Clearance Is a Performance Requirement
Clearance is the intentional difference between the contents and the internal slipcase space. It cannot be selected responsibly from one universal table.
The working allowance depends on:
- board cutting and assembly capability;
- inner lining thickness and smoothness;
- wrap material and adhesive build;
- book surface friction;
- dust-jacket stiffness and fold behavior;
- foil, embossing or other raised contact points;
- number and weight of volumes;
- loading orientation;
- humidity and conditioning;
- desired retention and removal feel.
Instead of asking, “Should we add 2 mm or 3 mm?”, define the performance:
- The complete set can be inserted without forcing the jacket or rubbing visible foil.
- A reader can remove the book from a shelf using the intended access feature.
- The books do not rattle or lean excessively in normal shelf use.
- The case does not grip only one local high point.
- Normal dimensional variation in accepted books does not cause jamming.
- The books do not fall out during ordinary handling in the approved orientation.
The box maker can then select a starting allowance and prove it with a sample. The approved internal dimensions and fit behavior should both appear in the specification.
The Fit Equation Is Simple; the Inputs Are Not
The dimensional logic can be written without pretending to know a universal allowance:
Target internal height = maximum accepted content height + approved vertical working clearance
Target internal depth = maximum accepted content depth + approved depth clearance
Target internal width = maximum accepted set thickness + dividers or liners + approved lateral working clearance
These equations describe intent. They are not instructions for drawing the structural dieline.
The slipcase manufacturer must translate the approved internal space into external dimensions and board pieces. Board thickness, wrap folds, lining, construction sequence and equipment affect that conversion. Do not add board thickness casually to a sketch and treat it as a production drawing.
Dust Jackets Change More Than Thickness

A jacket does add material, but the more difficult issue is friction and localized folding.
Check:
- whether the jacket is fully seated against the case;
- whether flap folds create ridges inside the boards;
- whether lamination makes the surface slippery, tacky or prone to polishing;
- whether the jacket projects beyond the cover at the head or tail;
- whether foil or spot UV on the jacket contacts the lining;
- whether repeated removal creases the jacket near the spine;
- whether the jacket is part of every unit or only one edition variant.
Measure and test the book with the final jacket fitted. Do not add the flat sheet caliper mathematically to the bare case and assume it represents folded behavior.
If the case has already been produced with a gloss finish, adding a matte jacket changes the outer presentation but does not convert the underlying case to matte. That distinction should remain clear in both artwork and enclosure approvals.
The book jacket and slipcase product is particularly relevant when these two components are developed together rather than sized independently.
Surface Finish Determines How Tight “Premium” Can Feel
A close fit is sometimes mistaken for high quality. On a low-friction surface it may feel controlled. On a delicate surface it may be the mechanism that damages the book.
Cloth and linen
Pronounced texture increases contact and can polish high points. Light cloth may also pick up dirt from repeated handling. Test the actual cloth color and weave against the proposed lining.
Matte and soft-touch lamination
These surfaces can show rubbing, fingerprints or burnishing differently. A fit sample should be cycled and inspected under angled light, not judged only when first assembled.
Foil and embossing
Raised or reflective details near a contact wall can scuff or catch. A large foil area may reveal fine scratching more readily than an uncoated surface. Place the most sensitive decoration where the structure and lining protect it.
Decorated page edges
The open side typically leaves the spines visible, while the fore edges enter toward the closed end. Edge decoration can still be affected by insertion, dust and handling. Confirm loading direction and avoid letting a rough internal seam contact the page edge.
The broader interaction between foil, UV, debossing and decorated edges is covered in PrintPack360’s hardcover book finishing guide.
Multi-Volume Sets Need a Tolerance Stack
A two-volume set is not simply one thick book. Each volume can vary independently, and the enclosure adds its own variation.
For a set, record:
- maximum height of every volume;
- maximum depth of every volume;
- individual thickness distribution;
- total natural set thickness in loading order;
- jacket or wrap on each volume;
- dividers, tabs or pull ribbons;
- intended spine alignment at the open side;
- whether the volumes are interchangeable in order;
- weight and ease of removing one volume without dropping another.
Do not calculate total set thickness solely by adding nominal spine widths from artwork. Measure actual sets. If three books are each near the thick end of accepted production variation, their combined width may be materially different from a set assembled from average samples.
If the volumes differ in thickness, the case may need a fixed loading order. Record that order in packing instructions and test whether a customer can return the books intuitively.
A Real Two-Volume Brief Shows the Sequence
An anonymized PrintPack360 collector-edition brief specified two 170 x 240 mm hardcovers, each approximately 750 pages. The books called for 70 gsm cream high-opacity paper, sewn case binding, 3 mm boards, premium non-PVC PU, foil plus separate debossing, decorated edges and a printed ribbon. Both volumes were to fit inside a fully PU-wrapped double-book slipcase.
The nominal trim and page count were enough to discuss concept and provisional cost. They were not enough to freeze the enclosure.
A defensible sequence for this kind of project is:
- Lock the paper, pagination, sewing and book structure.
- Produce representative finished books with the final PU and cover decoration.
- Let the samples condition before dimensional approval.
- Fit the jackets or wraps if they are part of the set.
- Measure each volume and the complete ordered pair at several points.
- Build the slipcase dummy around the recorded maximum contents and proposed lining.
- Test removal, replacement, spine alignment and surface contact.
- Approve a complete Golden Sample with IDs for both books and the slipcase.
- Check actual production books before all slipcases are completed.
The risk is connected. A paper change affects both book spines. Two thicker books change the combined set width. A different PU or lining changes friction. Separate foil and debossing can create local contact points. The enclosure is therefore the final link in the specification, not an independent box designed from an early rendering.
Single-Volume and Multi-Volume Measuring Sheet
Use the following information in the quotation and sample record.
| Field | Single volume | Multi-volume set |
|---|---|---|
| Finished book ID | One title and revision | Every volume and revision |
| Quantity | Total sets | Total sets plus units per volume |
| Height input | Highest accepted book | Tallest accepted volume |
| Depth input | Deepest accepted book | Deepest accepted volume |
| Thickness input | Thickest accepted finished book | Greatest measured complete set width |
| Retail condition | Bare, jacketed, banded or wrapped | Condition of each volume plus dividers |
| Loading order | Spine orientation and open-side direction | Exact sequence and orientation of all volumes |
| Surface risk | Cloth, matte film, foil, edges | Contact between books plus enclosure surfaces |
| Removal method | Thumb notch, exposed edge or pull feature | Access to one volume without destabilizing others |
| Proof required | Fit dummy and finished set sample | Complete ordered set and tolerance-stack check |
The finished hardcover art catalog with slipcase is a useful product reference for a single image-led volume. Buyers who are still deciding whether a slipcase is the right enclosure should first use the slipcase versus clamshell box guide to compare access, protection and presentation.
How to Test the Physical Slipcase Sample
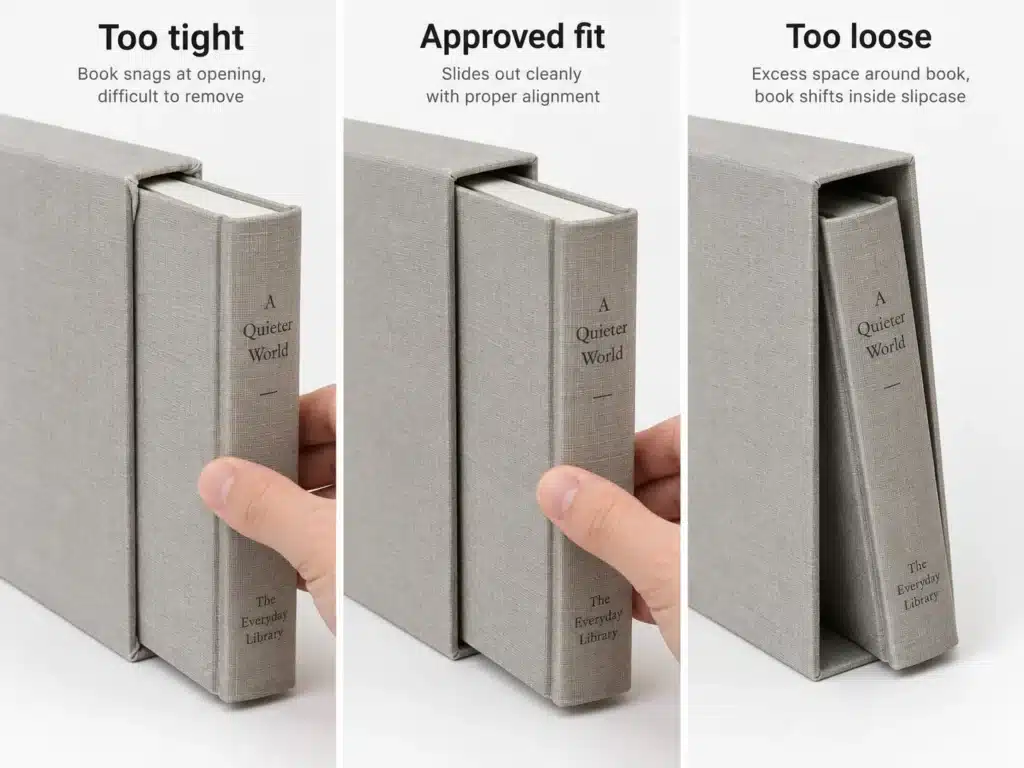
The sample review should imitate real use, not merely confirm that the book can be pushed inside once.
Confirm identity first
- Are the books the approved revision?
- Are paper, boards, cover material, jacket and finishes representative?
- Is the slipcase board, lining and wrap final?
- Are any substitutions written down?
Test insertion
Load the book in the intended orientation without squeezing the jacket or pressing the boards together. Watch for a single tight zone, internal seam contact, trapped air and snagging near decoration.
Test shelf removal
Stand the case upright between neighboring books or flat surfaces that simulate shelf access. Confirm that the exposed spine, thumb notch or pull feature gives the reader a sensible grip. A book that can be removed only by shaking the case is too dependent on ideal tabletop handling.
Repeat the cycle
Insert and remove the book repeatedly using normal hand force. Inspect the jacket, lamination, cloth, foil and lining under raking light. The purpose is not to impose a universal cycle count; it is to reveal immediate abrasion, polishing or catching before approval.
Test all accepted book samples
Do not approve the enclosure only with the thinnest or straightest book. Use representative books across the measured range. For a set, test different accepted combinations where production variation can accumulate.
Observe after conditioning
Board, paper, cloth and adhesive respond to moisture and drying. Recheck fit after the sample has stabilized in the agreed review environment. If the destination climate or storage route is demanding, discuss additional conditioning and packaging controls with the manufacturer.
PrintPack360’s sample strategy helps distinguish a white structural dummy, printed sample, finish test and production reference. A blank dummy can approve basic fit, but it cannot approve how a delicate printed or laminated surface behaves during repeated use.
Production QC: Fit Must Be Checked in Both Directions
Bulk inspection needs samples of books and samples of slipcases.
Check:
- internal slipcase height, depth and width against the approved drawing;
- board squareness and open-end alignment;
- lining seams, bubbles, wrinkles and exposed edges;
- book height, depth and thickness distribution;
- insertion and removal using books from different production batches;
- jacket and cover surfaces after the fit test;
- spine exposure and visual alignment at the open side;
- whether accepted books can be packed in the specified order;
- individual wrapping and master-carton protection;
- retained Golden Sample identification.
Checking only empty slipcases misses book variation. Checking only books misses enclosure variation. The functional inspection pairs them.
For a high-value set, define major fit defects before production. Examples may include a book that cannot be removed normally, visible jacket abrasion caused by the enclosure, a set that falls out during agreed handling, or internal construction that marks the book. The exact acceptance method belongs in the order specification rather than being invented after delivery.
Retail Slipcase Is Not the Same as a Preservation Box
A retail slipcase is designed for presentation, shelf grouping and repeated access. It should not automatically be described as archival protection.
The Canadian Conservation Institute notes that a properly sized enclosure can protect an object during handling, while also explaining that a slipcase leaves the spine exposed to light. CCI: Making Enclosures for Books and Paper Objects
NEDCC is more cautious and advises against slipcases for preservation because sliding can abrade bindings and the spine remains exposed. Its preference for valuable or fragile books is a complete custom-fitted enclosure such as a clamshell box.
For a modern collector edition in sound condition, this does not mean a commercial slipcase is unusable. It means the claims should be accurate:
- It offers shelf organization and partial physical protection.
- It does not protect the exposed spine from light.
- Poor fit can create abrasion.
- Fragile, historic or conservation objects need advice and materials appropriate to preservation rather than retail packaging alone.
Information to Send for a Reliable Slipcase Quote
Provide:
- title or project name;
- one, two or more books per set;
- finished book height, depth and thickness measurements;
- nominal trim, page count, paper and binding for context;
- jackets, belly bands, shrink wrap, dividers or added components;
- exact loading order and spine orientation;
- book cover and surface finishes;
- target slipcase structure and visual reference;
- board, lining and wrap preference if known;
- printing, foil, embossing, debossing or UV requirements;
- quantity and optional quantity breaks;
- sample and inspection requirements;
- packing method, destination and target delivery date;
- whether measurements come from finished books, a dummy or estimates.
Label estimated dimensions as estimated. This allows the supplier to quote provisionally without mistaking an early number for permission to cut bulk board.
For complete book production, start with the hardcover book printing category and develop the enclosure after the physical book specification is stable.
FAQ
How much clearance should I add to a book slipcase?
There is no universal allowance. Clearance depends on book variation, board construction, lining, jacket, surface friction, finishes and the desired removal feel. Measure representative finished books and approve the allowance with a physical fit sample.
Should I measure the page size or the hardcover boards?
Measure the maximum outside dimensions of the completed book. Hardcover boards usually project beyond the trimmed pages, so nominal page size is not sufficient.
Do I measure a hardcover with the dust jacket on?
Yes, when the jacket will remain on the book inside the slipcase. Fit the final jacket normally, then measure the complete book and test actual insertion rather than adding jacket-paper thickness mathematically.
How do I measure several books for one slipcase?
Measure the tallest and deepest accepted volumes, then measure the complete set thickness in its intended order and retail condition. Do not rely only on the sum of nominal spine widths.
Can the slipcase be designed before the books are printed?
A provisional dieline or white dummy can be made from expected dimensions, but bulk dimensions should remain open until representative finished books are measured. Late changes to paper, binding, boards or jackets can alter the fit.
How do I know whether the slipcase is too tight?
Warning signs include forced insertion, difficulty removing the book from a shelf, visible rubbing, polished matte areas, creased jackets, snagging at decoration or failure to accept other approved book samples.
Does a slipcase protect a book during international shipping?
It provides presentation and some surface support, but it is not the shipping carton. The complete set still needs individual protection, suitable corrugated cartons, moisture planning and a packing method designed for the actual delivery route.
Send PrintPack360 the measured contents, loading order, surface materials, desired structure, quantity and destination. The custom jacket and slipcase service can then be developed around the actual edition, with the working clearance confirmed through a structural dummy or finished set sample before bulk production.